


What Is Heroku?
Heroku is a cloud platform that lets people and companies build, deliver, monitor and scale apps seamlessly. All time use of Heroku is absolutely easy and smooth with auto-deployment and anyone with basic knowledge of software development can get started easily. Now this content is not only a value proposition to tell you to use Heroku. Of course "Why haven't you deployed your first app on Heroku by the way?"
If you want to know more about Heroku, check out their official website.
But Why Did I Choose Heroku?
Heroku has their own pricing schemes and for beginners out there, their free tier is quite sufficient. But one downside of using the free tier is that your app is automatically put to sleep after 30 minutes of inactivity.
You need to calm down, I'm not done.
This does not mean your app will be dead after 30 minutes—it just means your app will take some time (within 5–10 seconds) to wake up. Thankfully, there are many ways out there to avoid that if your app cannot tolerate that. They walkaround is mostly based on pinging your app on interval(s).
How Did I Keep My Heroku App Alive?
You can choose to keep you application alive by choosing any of the two options listed below. So walk with me.
- You can install the free New Relic add-on. The New Relic add-on has an availability monitor feature. The availability monitor feature will ping your site two times in one minute, thus preventing the dyno from idling.
P.S before you say this doesn't work, the important part of using the New Relic Addon is the "availability monitor". Just installing the addon won't do the job; you would have to also setup the availability monitoring using the URL of your Heroku app.
- You can also handle pinging your own app manually or automate the process. Writing a function within your app to ping itself and still keeping to this restriction can be quite tricky. It is not impossible; you just have to spend some time writing a proper function to handle that. You may choose to do it manually but there is a catch- the Heroku free tier requires applications to sleep a minimum of seven hours every day. Unverified accounts get 550 of free dyno hours per month, which is equal to almost seven hours of sleep time for a month of 31 days. To be on the safe side, we’ll go with seven hours of sleep and I have chosen to automate the process but how was this possible?
cron-job[dot]org to the rescue!
Follow These Steps
- Signup on cron-job.org/en
- Once the signup is completed, verify your email.
- Once you log in successfully, click on the Cronjobs tab. And click on “Create cronjob”.
- Now you can fill in the details. Make sure you enter URL accordingly.
- When you reach the Schedule section, click on the option User-defined. Now make sure you select all the values in the columns Days of Month Days of Week, and Months.
Notice: You can select multiple entries by pressing and holding the Ctrl key while clicking the desired entries. Alternatively, drag over the desired entries while clicking and holding the left mouse button. In the Hours column, you have to select all values except 0,1,2,3,4,5,6. Selecting all values except for 0,1,2,3,4,5,6, means my app will be asleep from 12 a.m. to 7 a.m. (no job at 6 a.m. means the app will be asleep at 6 a.m.). This step is essential as it satisfies the restriction for the free tier.
- In the Minutes column, you will have to select values 0 and 30 only because your app will sleep every 30 minutes.
Check the image reference below:
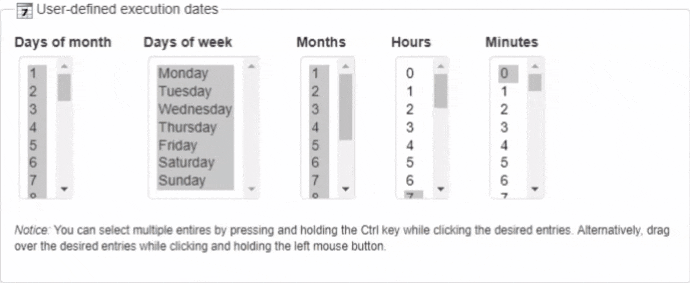
This image is how your schedule settings will look in the end. Once everything looks fine, you are good-to-go. You can go ahead to create your cron job.
Never Stop Creating!